Java--业务场景:SpringBoot 通过Redis进行IP封禁实现接口防刷
前言
- 在实际项目中,有些攻击者会使用自动化工具来频繁刷新接口,造成系统的瞬时吞吐量提高,给系统带来很大的压力。要保障服务的安全性,需要防止重要的接口被恶意刷新,接口防刷的方式可以通过设置验证码,IP封禁,安全参数校验等方法。
- 本文主要采用Redis将同一时间内频繁访问同一接口的IP封禁一段时间的方式来防止接口被恶意刷新。
具体实现步骤
1. 定义自定义注解
- 添加了该注解的接口,将开启接口防刷功能。
1
2
3
4
5
6
7
8
9
10
11
12
13
14
15
16
17
18
19
20
21
22
/**
* 防刷注解
*/
public AccessLimit {
/**
* 表示规定的时间范围
*/
int seconds();
/**
* 表示在规定的时间范围内最多可被访问的次数
*/
int maxCount();
/**
* 表示该接口是否需要登录,默认为true
*/
boolean needLogin() default true;
}2. 编写拦截器类IpUrlLimitInterceptor
- 核心拦截器IpUrlLimitInterceptor的代码如下:
1
2
3
4
5
6
7
8
9
10
11
12
13
14
15
16
17
18
19
20
21
22
23
24
25
26
27
28
29
30
31
32
33
34
35
36
37
38
39
40
41
42
43
44
45
46
47
48
49
50
51
52
53
54
55
56
57
58
59
60
61
62
63
64
65
66
67
68
69
70
71
72
73
74
75
76
77
78
79
80
81
82
83
84
85
86
87
88
89
90
91
92
93
94
95
96
97
98
99
public class IpUrlLimitInterceptor implements HandlerInterceptor {
RedisUtil redisUtil; //redis工具类
private TokenManager tokenManager; //登录时的token检验管理器
private static final String LOCK_IP_URL_KEY = "lock_ip_";
private static final String IP_URL_REQ_TIME = "ip_url_times_";
private static final int IP_LOCK_TIME = 60; //IP被禁用的时间 此处为了方便测试,设置为一分钟 实际情况应该在配置文件里设置
public boolean preHandle(HttpServletRequest httpServletRequest, HttpServletResponse httpServletResponse, Object o) throws Exception {
if (o instanceof HandlerMethod) {
HandlerMethod hm = (HandlerMethod) o;
// 获取AccessLimit注解
AccessLimit accessLimit = hm.getMethodAnnotation(AccessLimit.class);
if(Objects.isNull(accessLimit)){
return true;
}
log.info("request请求地址uri={},ip={}", httpServletRequest.getRequestURI(), IpUtil.getIp(httpServletRequest));
//判断IP是否被锁定,若被锁定则访问异常提示信息
if (ipIsLock(IpUtil.getIp(httpServletRequest))) {
log.info("ip访问被禁止={}", IpUtil.getIp(httpServletRequest));
Result result = Result.exception().code(ResultCode.LOCK_IP).message("该IP已被锁定,请等候解锁");
returnJson(httpServletResponse, JSON.toJSONString(result));
return false;
}
//接口若需要登录,则校验token
//获取请求头里的token信息判断是否正确,若token不正确,则return false
if(accessLimit.needLogin()&&!tokenManager.checkToken(httpServletRequest.getHeader("Authorization"))){
return false;
}
//记录请求次数,记录后若大于规定时间内的规定次数则返回异常提示信息
if (!addRequestTime(IpUtil.getIp(httpServletRequest), httpServletRequest.getRequestURI(), accessLimit.seconds(),accessLimit.maxCount())) {
Result result = Result.exception().code(ResultCode.LOCK_IP).message("该IP已被锁定,请等候解锁");
returnJson(httpServletResponse, JSON.toJSONString(result));
return false;
}
}
return true;
}
public void postHandle(HttpServletRequest httpServletRequest, HttpServletResponse httpServletResponse, Object o, ModelAndView modelAndView) throws Exception {}
public void afterCompletion(HttpServletRequest httpServletRequest, HttpServletResponse httpServletResponse, Object o, Exception e) throws Exception {}
/**
* @param ip
* @return java.lang.Boolean
* @Description: 判断ip是否被禁用
*/
private Boolean ipIsLock(String ip) {
if (redisUtil.hasKey(LOCK_IP_URL_KEY + ip)) {
return true;
}
return false;
}
/**
* @param ip
* @param uri
* @return java.lang.Boolean
* @Description: 记录请求次数
*/
private Boolean addRequestTime(String ip, String uri,int seconds,int maxCount) {
String key = IP_URL_REQ_TIME + ip + uri;
if (redisUtil.hasKey(key)) {
//访问次数加1
long time = redisUtil.incrBy(key, 1);
if (time >= maxCount) {
redisUtil.getLock(LOCK_IP_URL_KEY + ip, ip, IP_LOCK_TIME);
return false;
}
} else {
//seconds秒内访问maxCount次就锁柱
redisUtil.getLock(key, 1, seconds);
}
return true;
}
private void returnJson(HttpServletResponse response, String json) throws Exception {
PrintWriter writer = null;
response.setCharacterEncoding("UTF-8");
response.setContentType("text/json; charset=utf-8");
try {
writer = response.getWriter();
writer.print(json);
} catch (IOException e) {
log.error("LoginInterceptor response error ---> {}", e.getMessage(), e);
} finally {
if (writer != null) {
writer.close();
}
}
}
} - 上述代码中的RedisUtil具体方法如下,完整的RedisUtil类获取方式:Java - Redis操作的工具类RedisUtil
1
2
3
4
5
6
7
8
9
10
11
12
13
14
15
16
17
18
19
20
21
22
23
24
25
26
27
28
29
30
31
32
33
34
public class RedisUtil {
private static final Long SUCCESS = 1L;
private RedisTemplate<String, Object> redisTemplate;
/**
* 获取锁
* 代码中redis的使用的是分布式锁的形式,这样可以最大程度保证线程安全和功能的实现效果。
* @param lockKey
* @param value
* @param expireTime:单位-秒
* @return
*/
public boolean getLock(String lockKey, Object value, int expireTime) {
try {
log.info("添加分布式锁key={},expireTime={}", lockKey, expireTime);
String script = "if redis.call('setnx',KEYS[1],ARGV[1]) then if redis.call('get',KEYS[1])==ARGV[1] then return redis.call('expire',KEYS[1],ARGV[2]) else return 0 end end";
RedisScript<Long> redisScript = new DefaultRedisScript<>(script, Long.class);
Object result = redisTemplate.execute(redisScript, Collections.singletonList(lockKey), value, expireTime);
if (SUCCESS.equals(result)) {
return true;
}
} catch (Exception e) {
e.printStackTrace();
}
return false;
}
//其他方法....
} - 拦截器中的IpUtil工具类获取方式:Java-IpUtil通过请求获取IP信息的工具类
3. 在WebConfig类中添加IpUrlLimitInterceptor
1
2
3
4
5
6
7
8
9
10
11
12
13
14
15
16
17
public class WebConfig extends WebMvcConfigurerAdapter {
IpUrlLimitInterceptor getIpUrlLimitInterceptor() {
return new IpUrlLimitInterceptor();
}
/**
* 注册登录ip防刷拦截器
* @return
*/
public void addInterceptors(InterceptorRegistry registry) {
registry.addInterceptor(getIpUrlLimitInterceptor()).addPathPatterns("/**");
super.addInterceptors(registry);
}
}4. 添加注解到接口上
- 编写一个接口,将刚刚的防刷注解添加上去
1
2
3
4
5
6
7
8
9
10
11
12
13
14
public class UtilController {
/**
* 防刷注解测试
* @return
*/
//表示一秒内该接口只能访问五次,防止恶意刷流量,这里接口无需登录
public Result ipLimitTest(){
return Result.ok().data("访问成功");
}
}测试效果
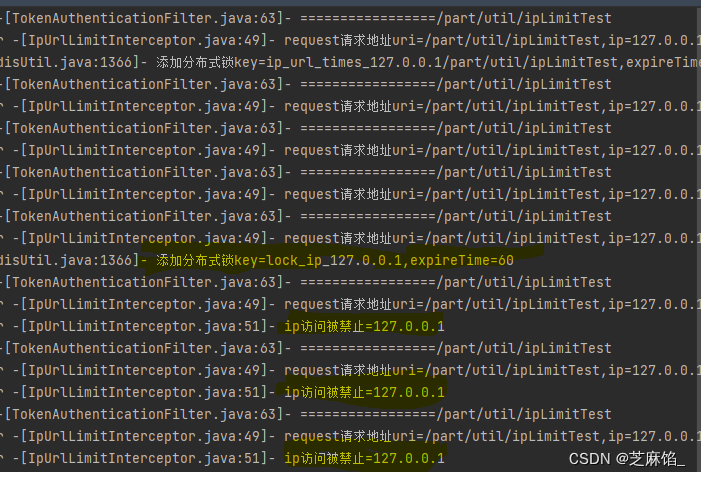
- 手写一个for循环请求10次ipLimitTest()接口,观察日志情况如下:
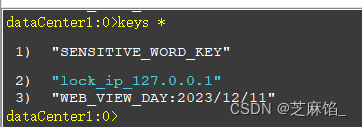
- 超过五次之后,该ip就被锁定1分钟。一分钟内的访问被禁止。此时查询redis的key,可以发现该ip锁住。
参考文章
All articles in this blog are licensed under CC BY-NC-SA 4.0 unless stating additionally.


